Before you can use EVP Office, you’ll need to install it, but before you install it, you should have an Account Information Key handy. An Account Information Key is used by the software to identify you to EVP Systems, so your use of the software can be properly billed. If you don’t have a Key (or if the Key you do have is over a week old, after which it expires), please contact our Support Department for a new one.
(If you don’t need to run evaluations, or would just like to check out the software before committing, you won’t need an Account Information Key. You can install the software and run it in “Edit-and-Print” or “Demonstration” mode.)
To get started, first you’ll need to download EVP Office. Every release of EVP Office is available from www.evpsys.com/software. There are no limits how many copies can be installed, and there is no charge for these installations. Billing is solely by use, and the details are available here.
The installer is available as a graphical step-by-step wizard, for human-accompanied installations. A Microsoft Installer (.MSI) is also available, for scripted installations. If you have any doubt about which one to use, just click the big red button on the download page—that’s the wizard.
The software runs on every version of Windows (7, 8.1, 10, 11, Server 2008, Server 2008 R2, Server 2012, Server 2012 R2, Server 2016, Server 2019, and Server 2022), and on any computer made in the last twenty years.
Once the installer is downloaded, double-click on the icon to begin the process. If you are prompted to enter the credentials for an administrative user when running the installer, but don’t know them, please contact your IT Department.
When the installer runs, you’ll be prompted to accept the EVP Systems Licensing Agreement. (A copy is available here, if you’d prefer a printable copy.) Select “I accept the agreement” and click Next ▸.
The next screen of the installer asks where you’d like EVP Office to be installed. This is a more important choice than it may seem, since the installation location can affect the way the program works. Please see the Selecting an Installation Location section below for details about this decision, especially if you change the default. Once you’ve selected a folder, click Next ▸.
EVP Office will now install. It will only take a minute or two. When it’s done, click Finish to close the installer. Each EVP Office application (EstateVal, GiftVal, CostBasis, and CapWatch) are now on your machine, with shortcuts on your desktop.
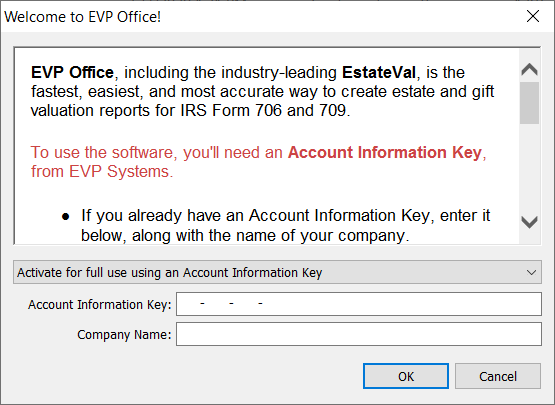
Double-click on the EstateVal shortcut. The program will run, and bring up a dialog box asking for your Account Information Key. Enter it, along with your company name, in the spaces provided and click OK. (If you don’t have a Key, you can request one from our Support Department. If you don’t need to run evaluations, you can change the drop-down above the Account Information Key field to “Activate for Edit and Print use only” and click OK. This will allow you to enter data, edit already evaluated portfolios, and print them, but not run evaluations yourself. If you’d just like to take a look at the software, you can change the drop-down to “Run in Demonstration mode” and click OK. This will let you play around with the software—including use Training Mode.)
EVP Office is now ready to use!
Check out the next tutorial: EstateVal (Introduction) ►
Selecting an Installation Location
When you first run the EVP Office installer, you will need to decide if you’d like to install the software for all the users on the machine, or just the current user.
Selecting the first option will require an administrative password, because the default location for the software is where Windows typically puts applications: in the Program Files directory (C:\Program Files (x86)\EVP Systems\). If you use this default, all the EVP Office applications will store their unique preference and licensing files in each user’s %APPDATA%\EVP Systems\ directories. This makes managing users easier—since they have their unique preferences automatically—but also requires that each user enter licensing information when they first run the apps. This isn’t a big deal with a few users, but if you have hundreds, it can be a problem. (Though putting the license file—EVPS.DT0—in the installation directory will cause it to be used by every user who does not have one in their personal folder.)
If you select the second installation option—installing the software for just the current user—the default location is where Windows typically puts applications for single users: in their personal Programs directory (%LOCALAPPDATA%\Programs\EVP Systems\). With this option, license information and preference files are stored in the installation directory.
EVP Systems strongly recommends using the default installation location, no matter which installation type you select.
However, if you choose to install the software in a location other than the default (for instance, if you put it on a shared network drive, so many users can use the same installation), all the users will share preference and licensing files. This is handy because making global changes is easy and you only need to install the Account Information Key once, but it also means that any preference changes will over-write the previous value for all users. This is probably not what you want.
Using EVP Administrator
If you install EVP Office somewhere other than the default and want individual preference files for each user (or want a way to change the preference defaults for those users), you can run EVP Administrator.
(EVP Administrator does not have a Desktop shortcut, so you need to go to the directory you installed EVP Office in, and run it directly, by double-clicking on evpadmin.exe.)
EVP Administrator lets you create EVP Office accounts, with unique usernames and passwords, independent from the Windows account the software is running as. These accounts are not intended as a security measure, but as an administrative convenience—they are not cryptographically secure and should not be used for limiting access to EVP Office. They exist to allow the users who are running the software from a non-default location to have their own preferences.
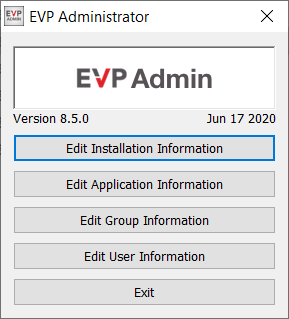
Clicking Edit Installation Information allows you to set some details about the EVP Office installation itself, including who to call in your organization if users run into trouble, and where the user’s preference files are stored.
Clicking Edit Application Information allows you to globally change the default preferences for each application, like via the Tools → Options… dialog box in each program. Each user will inherit those changes, but then be able to make additional changes custom to them. (For details about what each preference is, and how it affects the software, please see the list of in-application Help pages for Options.)
Clicking Edit Group Information allows you to create groups that users can be added to, and then set preferences just for those users in each group.
Clicking Edit User Information allows you to create users, setting their username and password, assign them to groups, as well as setting their default preferences, on a per-user basis.
When there is at least one user created in an EVP Office installation, when each application runs, it will prompt for EVP Office account credentials. Entering a proper username and password will start the app. But, again, these accounts are not intended for security or limiting who can run the applications—they merely are for managing preferences.
Dealing with Firewalls
All the EVP Office applications communicate with EVP Systems servers over the Internet, so if you have a firewall on your network that prevents out-bound connections, you’ll need to change the default configuration of the programs, your firewall, or both.
By default, each EVP Office application uses what we call the “Secure” evaluation method when they connect to our Data Center. The programs also support the older “Classic” evaluation method.
The easiest way to determine if you need to make any changes is to simply run an evaluation, as detailed in the introduction to EstateVal. Using the security identifier CASH will connect to the EVP Systems Data Center, letting you know if the firewall allows the connections or not, but won’t charge you anything.
If the evaluation results in errors using the “Secure” method, try switching to “Classic” (as detailed the Portfolio Evaluations section of the in-app instructions)—Secure communicates like a Web browser, while Classic attempts a simpler direct connection, so your network may already allow it.
If both the Secure and Classic evaluation methods fail, the next step is to configure the applications to use a proxy, if you have one available. Each application supports SOCKS4, SOCKS5, and HTTP Tunnel proxies, for both evaluation methods. Classic also supports Network Address Translation. Again, details are available in the Portfolio Evaluation sections of the on-line help.
If you don’t have a proxy available, then the next step is to change the firewall rules of your network, to allow the EVP Office applications to connect to our servers.
The Secure evaluation method connects to dc.evpsys.com (which does not have a fixed IP address) on port 443, using the HTTPS protocol.
The Classic evaluation method attempts to first connect to dc1.evpsys.com (which does not have a fixed IP address) on port 60000, using a custom protocol. If that fails, it then attempts to connect to dc2.evpsys.com (which does have a fixed IP address, 23.21.116.73) on port 60000. Opening your firewall to allow either of these connections should allow the Classic method to succeed.
If you continue to have trouble connecting, please contact our Support Department for help.
Installing via Script
EVP Office is normally added to a machine using the standard “Wizard” style installer. However, a command-line Windows Installer (MSI) version is also available, on our download page. Both the Setup Wizard and the MSI installers produce the same result, but doing a scripted install is often easier with the MSI.
The Wizard installer supports /COMPANY and /KEY command-line options, to automatically enter the Account Information Key details at installation time so the user does not have to when they first run the program. COMPANY should be the company name and KEY should be the Account Information Key, mirroring what would have been entered in the dialog above: "EVP Office Setup Wizard X.Y.Z.exe" /COMPANY "Example Inc." /KEY "1234-ABCD-5678-EFGH".
To suppress the installer dialogs, you can also add /VERYSILENT. To set the installation directory, you can add /DIR="X:\PATH\TO\INSTALLATION\FOLDER".
The MSI installer supports all these arguments as well, but they must be passed via a WRAPPED_ARGUMENTS command-line option: "EVP Office X.Y.Z.exe" WRAPPED_ARGUMENTS="/COMPANY ""Example Inc."" /KEY ""1234-ABCD-5678-EFGH"" /VERYSILENT /DIR=""X:\PATH\TO\INSTALLATION\FOLDER""". Please note that quoted items inside WRAPPED_ARGUMENTS have their quotes doubled so that WRAPPED_ARGUMENTS can itself be quoted.